This release contains minor fixes and improvements.
Changes and improvements
Improvements to better manage multi-user pre-login registrations.
Fixed an issue preventing devices from reaching split-tunneled traffic even when WARP was disconnected.
Fix to prevent WARP from re-enabling its firewall rules after a user-initiated disconnect.
Improvement to managed network detection checks for faster switching between managed networks.
Known issues
For Windows 11 24H2 users, Microsoft has confirmed a regression that may lead to performance issues like mouse lag, audio cracking, or other slowdowns. Cloudflare recommends users experiencing these issues upgrade to a minimum Windows 11 24H2 version KB5062553 or higher for resolution.
Devices using WARP client 2025.4.929.0 and up may experience Local Domain Fallback failures if a fallback server has not been configured. To configure a fallback server, refer to Route traffic to fallback server.
Devices with KB5055523 installed may receive a warning about Win32/ClickFix.ABA being present in the installer. To resolve this false positive, update Microsoft Security Intelligence to version 1.429.19.0 or later.
DNS resolution may be broken when the following conditions are all true:
WARP is in Secure Web Gateway without DNS filtering (tunnel-only) mode.
A custom DNS server address is configured on the primary network adapter.
The custom DNS server address on the primary network adapter is changed while WARP is connected.
To work around this issue, reconnect the WARP client by toggling off and back on.
This release contains minor fixes and improvements.
Changes and improvements
Fixed an issue preventing devices from reaching split-tunneled traffic even when WARP was disconnected.
Fix to prevent WARP from re-enabling its firewall rules after a user-initiated disconnect.
Improvement to managed network detection checks for faster switching between managed networks.
Known issues
macOS Sequoia: Due to changes Apple introduced in macOS 15.0.x, the WARP client may not behave as expected. Cloudflare recommends the use of macOS 15.4 or later.
Devices using WARP client 2025.4.929.0 and up may experience Local Domain Fallback failures if a fallback server has not been configured. To configure a fallback server, refer to Route traffic to fallback server.
This release contains minor fixes and improvements.
Changes and improvements
WARP proxy mode now uses the operating system's DNS settings. Changes made to system DNS settings while in proxy mode require the client to be turned off then back on to take effect.
Changes to the SCCM VPN boundary support feature to no longer restart the SMS Agent Host (ccmexec.exe) service.
Fixed an issue affecting clients in Split Tunnel Include mode, where access to split-tunneled traffic was blocked after reconnecting the client.
Known issues
For Windows 11 24H2 users, Microsoft has confirmed a regression that may lead to performance issues like mouse lag, audio cracking, or other slowdowns. Cloudflare recommends users experiencing these issues upgrade to a minimum Windows 11 24H2 version KB5062553 or higher for resolution.
Devices using WARP client 2025.4.929.0 and up may experience Local Domain Fallback failures if a fallback server has not been configured. To configure a fallback server, refer to Route traffic to fallback server.
Devices with KB5055523 installed may receive a warning about Win32/ClickFix.ABA being present in the installer. To resolve this false positive, update Microsoft Security Intelligence to version 1.429.19.0 or later.
DNS resolution may be broken when the following conditions are all true:
WARP is in Secure Web Gateway without DNS filtering (tunnel-only) mode.
A custom DNS server address is configured on the primary network adapter.
The custom DNS server address on the primary network adapter is changed while WARP is connected.
To work around this issue, reconnect the WARP client by toggling off and back on.
This release contains minor fixes and improvements.
Changes and improvements
WARP proxy mode now uses the operating system's DNS settings. Changes made to system DNS settings while in proxy mode require the client to be turned off then back on to take effect.
Fixed an issue affecting clients in Split Tunnel Include mode, where access to split-tunneled traffic was blocked after reconnecting the client.
For macOS deployments, the WARP client can now be managed using an mdm.xml file placed in /Library/Application Support/Cloudflare/mdm.xml. This new configuration option offers an alternative to the still supported method of deploying a managed plist through an MDM solution.
Known issues
macOS Sequoia: Due to changes Apple introduced in macOS 15.0.x, the WARP client may not behave as expected. Cloudflare recommends the use of macOS 15.4 or later.
Devices using WARP client 2025.4.929.0 and up may experience Local Domain Fallback failures if a fallback server has not been configured. To configure a fallback server, refer to Route traffic to fallback server.
This release contains minor fixes and improvements.
Changes and improvements
WARP proxy mode now uses the operating system's DNS settings. Changes made to system DNS settings while in proxy mode require the client to be turned off then back on to take effect.
Fixed an issue affecting clients in Split Tunnel Include mode, where access to split-tunneled traffic was blocked after reconnecting the client.
Known issues
Devices using WARP client 2025.4.929.0 and up may experience Local Domain Fallback failures if a fallback server has not been configured. To configure a fallback server, refer to Route traffic to fallback server.
You can now run your Browser Rendering locally using npx wrangler dev, which spins up a browser directly on your machine before deploying to Cloudflare's global network. By running tests locally, you can quickly develop, debug, and test changes without needing to deploy or worry about usage costs.
Now, when you connect your Cloudflare Worker to a git repository on GitHub or GitLab, each branch of your repository has its own stable preview URL, that you can use to preview code changes before merging the pull request and deploying to production.
This works the same way that Cloudflare Pages does — every time you create a pull request, you'll automatically get a shareable preview link where you can see your changes running, without affecting production. The link stays the same, even as you add commits to the same branch.
These preview URLs are named after your branch and are posted as a comment to each pull request. The URL stays the same with every commit and always points to the latest version of that branch.
Preview URL types
Each comment includes two preview URLs as shown above:
Commit Preview URL: Unique to the specific version/commit (e.g., <version-prefix>-<worker-name>.<subdomain>.workers.dev)
Branch Preview URL: A stable alias based on the branch name (e.g., <branch-name>-<worker-name>.<subdomain>.workers.dev)
How it works
When you create a pull request:
A preview alias is automatically created based on the Git branch name (e.g., <branch-name> becomes <branch-name>-<worker-name>.<subdomain>.workers.dev)
No configuration is needed, the alias is generated for you
The link stays the same even as you add commits to the same branch
Preview URLs are posted directly to your pull request as comments (just like they are in Cloudflare Pages)
Custom alias name
You can also assign a custom preview alias using the Wrangler CLI, by passing the --preview-alias flag when uploading a version of your Worker:
Terminal window
wranglerversionsupload--preview-aliasstaging
Limitations while in beta
Only available on the workers.dev subdomain (custom domains not yet supported)
Requires Wrangler v4.21.0+
Preview URLs are not generated for Workers that use Durable Objects
The addition of this feature allows a user to extract audio from a source video, outputting
an M4A file to use in downstream workflows like AI inference, content moderation, or transcription.
Subaddressing, as defined in RFC 5233 ↗, also known as plus addressing, is now supported in Email Routing. This enables using the "+" separator to augment your custom addresses with arbitrary detail information.
Now you can send an email to user+detail@example.com and it will be captured by the user@example.com custom address. The +detail part is ignored by Email Routing, but it can be captured next in the processing chain in the logs, an Email Worker or an Agent application ↗.
Customers can use this feature to dynamically add context to their emails, such as tracking the source of an email or categorizing emails without needing to create multiple custom addresses.
Check our Developer Docs to learn on to enable subaddressing in Email Routing.
This week's update highlights several high-impact vulnerabilities affecting Microsoft SharePoint Server. These flaws, involving unsafe deserialization, allow unauthenticated remote code execution over the network, posing a critical threat to enterprise environments relying on SharePoint for collaboration and document management.
Key Findings
Microsoft SharePoint Server (CVE-2025-53770): A critical vulnerability involving unsafe deserialization of untrusted data, enabling unauthenticated remote code execution over the network. This flaw allows attackers to execute arbitrary code on vulnerable SharePoint servers without user interaction.
Microsoft SharePoint Server (CVE-2025-53771): A closely related deserialization issue that can be exploited by unauthenticated attackers, potentially leading to full system compromise. The vulnerability highlights continued risks around insecure serialization logic in enterprise collaboration platforms.
Impact
Together, these vulnerabilities significantly weaken the security posture of on-premise Microsoft SharePoint Server deployments. By enabling remote code execution without authentication, they open the door for attackers to gain persistent access, deploy malware, and move laterally across enterprise environments.
Ruleset
Rule ID
Legacy Rule ID
Description
Previous Action
New Action
Comments
Cloudflare Managed Ruleset
100817
Microsoft SharePoint - Deserialization - CVE:CVE-2025-53770
N/A
Block
This is a New Detection
Cloudflare Managed Ruleset
100818
Microsoft SharePoint - Deserialization - CVE:CVE-2025-53771
This week's update spotlights several critical vulnerabilities across Citrix NetScaler Memory Disclosure, FTP servers and network application. Several flaws enable unauthenticated remote code execution or sensitive data exposure, posing a significant risk to enterprise security.
Key Findings
Wing FTP Server (CVE-2025-47812): A critical Remote Code Execution (RCE) vulnerability that enables unauthenticated attackers to execute arbitrary code with root/SYSTEM-level privileges by exploiting a Lua injection flaw.
Infoblox NetMRI (CVE-2025-32813): A remote unauthenticated command injection flaw that allows an attacker to execute arbitrary commands, potentially leading to unauthorized access.
Citrix Netscaler ADC (CVE-2025-5777, CVE-2023-4966): A sensitive information disclosure vulnerability, also known as "Citrix Bleed2", that allows the disclosure of memory and subsequent remote access session hijacking.
Akamai CloudTest (CVE-2025-49493): An XML External Entity (XXE) injection that could lead to read local files on the system by manipulating XML input.
Impact
These vulnerabilities affect critical enterprise infrastructure, from file transfer services and network management appliances to application delivery controllers. The Wing FTP RCE and Infoblox command injection flaws offer direct paths to deep system compromise, while the Citrix "Bleed2" and Akamai XXE vulnerabilities undermine system integrity by enabling session hijacking and sensitive data theft.
Ruleset
Rule ID
Legacy Rule ID
Description
Previous Action
New Action
Comments
Cloudflare Managed Ruleset
100804
BerriAI - SSRF - CVE:CVE-2024-6587
Log
Log
This is a New Detection
Cloudflare Managed Ruleset
100805
Wing FTP Server - Remote Code Execution - CVE:CVE-2025-47812
Your real-time applications running over Cloudflare Tunnel are now faster and more reliable. We've completely re-architected the way cloudflared proxies UDP traffic in order to isolate it from other traffic, ensuring latency-sensitive applications like private DNS are no longer slowed down by heavy TCP traffic (like file transfers) on the same Tunnel.
This is a foundational improvement to Cloudflare Tunnel, delivered automatically to all customers. There are no settings to configure — your UDP traffic is already flowing faster and more reliably.
What’s new:
Faster UDP performance: We've significantly reduced the latency for establishing new UDP sessions, making applications like private DNS much more responsive.
Greater reliability for mixed traffic: UDP packets are no longer affected by heavy TCP traffic, preventing timeouts and connection drops for your real-time services.
This week’s vulnerability analysis highlights emerging web application threats that exploit modern JavaScript behavior and SQL parsing ambiguities. Attackers continue to refine techniques such as attribute overloading and obfuscated logic manipulation to evade detection and compromise front-end and back-end systems.
Key Findings
XSS – Attribute Overloading: A novel cross-site scripting technique where attackers abuse custom or non-standard HTML attributes to smuggle payloads into the DOM. These payloads evade traditional sanitization logic, especially in frameworks that loosely validate attributes or trust unknown tokens.
XSS – onToggle Event Abuse: Exploits the lesser-used onToggle event (triggered by elements like <details>) to execute arbitrary JavaScript when users interact with UI elements. This vector is often overlooked by static analyzers and can be embedded in seemingly benign components.
SQLi – Obfuscated Boolean Logic: An advanced SQL injection variant that uses non-standard Boolean expressions, comment-based obfuscation, or alternate encodings (for example, /*!true*/, AND/**/1=1) to bypass basic input validation and WAF signatures. This technique is particularly dangerous in dynamic query construction contexts.
Impact
These vulnerabilities target both user-facing components and back-end databases, introducing potential vectors for credential theft, session hijacking, or full data exfiltration. The XSS variants bypass conventional filters through overlooked HTML behaviors, while the obfuscated SQLi enables attackers to stealthily probe back-end logic, making them especially difficult to detect and block.
Use our brand new onboarding experience for Cloudflare Zero Trust. New and returning users can now engage with a Get Started tab with walkthroughs for setting up common use cases end-to-end.
There are eight brand new onboarding guides in total:
Securely access a private network (sets up device client and Tunnel)
Device-to-device / mesh networking (sets up and connects multiple device clients)
Network to network connectivity (sets up and connects multiple WARP Connectors, makes reference to Magic WAN availability for Enterprise)
Secure web traffic (sets up device client, Gateway, pre-reqs, and initial policies)
Secure DNS for networks (sets up a new DNS location and Gateway policies)
Clientless web access (sets up Access to a web app, Tunnel, and public hostname)
Clientless SSH access (all the same + the web SSH experience)
Clientless RDP access (all the same + RDP-in-browser)
Each flow walks the user through the steps to configure the essential elements, and provides a “more details” panel with additional contextual information about what the user will accomplish at the end, along with why the steps they take are important.
You can now expect 3-5× faster indexing in AutoRAG, and with it, a brand new Jobs view to help you monitor indexing progress.
With each AutoRAG, indexing jobs are automatically triggered to sync your data source (i.e. R2 bucket) with your Vectorize index, ensuring new or updated files are reflected in your query results. You can also trigger jobs manually via the Sync API or by clicking “Sync index” in the dashboard.
With the new jobs observability, you can now:
View the status, job ID, source, start time, duration and last sync time for each indexing job
Inspect real-time logs of job events (e.g. Starting indexing data source...)
See a history of past indexing jobs under the Jobs tab of your AutoRAG
This makes it easier to understand what’s happening behind the scenes.
Coming soon: We’re adding APIs to programmatically check indexing status, making it even easier to integrate AutoRAG into your workflows.
Cloudflare Zero Trust customers can use the App Library to get full visibility over the SaaS applications that they use in their Gateway policies, CASB integrations, and Access for SaaS applications.
App Library, found under My Team, makes information available about all Applications that can be used across the Zero Trust product suite.
You can use the App Library to see:
How Applications are defined
Where they are referenced in policies
Whether they have Access for SaaS configured
Review their CASB findings and integration status.
Within individual Applications, you can also track their usage across your organization, and better understand user behavior.
Workers now support breakpoint debugging using VSCode's built-in JavaScript Debug Terminals ↗. All you have to do is open a JS debug terminal (Cmd + Shift + P and then type javascript debug) and run wrangler dev (or vite dev) from within the debug terminal. VSCode will automatically connect to your running Worker (even if you're running multiple Workers at once!) and start a debugging session.
In 2023 we announced breakpoint debugging support ↗ for Workers, which meant that you could easily debug your Worker code in Wrangler's built-in devtools (accessible via the [d] hotkey) as well as multiple other devtools clients, including VSCode ↗. For most developers, breakpoint debugging via VSCode is the most natural flow, but until now it's required manually configuring a launch.json file ↗, running wrangler dev, and connecting via VSCode's built-in debugger. Now it's much more seamless!
You can now specify the number of connections your Hyperdrive configuration uses to connect to your origin database.
All configurations have a minimum of 5 connections. The maximum connection count for a Hyperdrive configuration depends on the Hyperdrive limits of your Workers plan.
This feature allows you to right-size your connection pool based on your database capacity and application requirements. You can configure connection counts through the Cloudflare dashboard or API.
Browser-based RDP with Cloudflare Access is now available in open beta for all Cloudflare customers. It enables secure, remote Windows server access without VPNs or RDP clients.
With browser-based RDP, you can:
Control how users authenticate to internal RDP resources with single sign-on (SSO), multi-factor authentication (MFA), and granular access policies.
Record who is accessing which servers and when to support regulatory compliance requirements and to gain greater visibility in the event of a security event.
Eliminate the need to install and manage software on user devices. You will only need a web browser.
Reduce your attack surface by keeping your RDP servers off the public Internet and protecting them from common threats like credential stuffing or brute-force attacks.
We are introducing a new feature of AI Audit — Pay Per Crawl. Pay Per Crawl enables site owners to require payment from AI crawlers every time the crawlers access their content, thereby fostering a fairer Internet by enabling site owners to control and monetize how their content gets used by AI.
For Site Owners:
Set pricing and select which crawlers to charge for content access
Manage payments via Stripe
Monitor analytics on successful content deliveries
For AI Crawler Owners:
Use HTTP headers to request and accept pricing
Receive clear confirmations on charges for accessed content
/bots/summary: Returns an overview of bot HTTP request distributions across key dimensions.
/bots/timeseries_groups: Provides time-series data on bot request distributions across the same dimensions.
These endpoints support filtering and breakdowns by:
bot: Bot name.
bot_operator: The organization or entity operating the bot.
bot_category: Classification of bot type.
The previously available verified_bots endpoints have now been deprecated in favor of this set of bot insights APIs.
While current data still focuses on verified bots, we plan to expand support for unverified bot traffic in the future.
Learn more about the new Radar bot and crawler insights in our blog post ↗.
You can now use any of Vite's static asset handling ↗ features in your Worker as well as in your frontend.
These include importing assets as URLs, importing as strings and importing from the public directory as well as inlining assets.
Additionally, assets imported as URLs in your Worker are now automatically moved to the client build output.
Here is an example that fetches an imported asset using the assets binding and modifies the response.
// Import the asset URL
// This returns the resolved path in development and production
The Email Routing platform supports SPF ↗ records and DKIM (DomainKeys Identified Mail) ↗ signatures and
honors these protocols when the sending domain has them configured. However, if the sending domain doesn't implement them,
we still forward the emails to upstream mailbox providers.
Starting on July 3, 2025, we will require all emails to be authenticated using at least one of the protocols, SPF or DKIM, to
forward them. We also strongly recommend that all senders implement the DMARC protocol.
If you are using a Worker with an Email trigger to receive email messages and forward them upstream, you will need to handle the case where
the forward action may fail due to missing authentication on the incoming email.
SPAM has been a long-standing issue with email. By enforcing mail authentication, we will increase the efficiency of identifying abusive senders and blocking
bad emails.
If you're an email server delivering emails to large mailbox providers, it's likely you already use these protocols; otherwise, please ensure
you have them properly configured.
Now, you can use remote bindings with your Next.js applications through the @opennextjs/cloudflare adaptor ↗ by enabling the experimental feature in your next.config.ts:
initOpenNextCloudflareForDev();
initOpenNextCloudflareForDev({
experimental: { remoteBindings: true }
});
Then, all you have to do is specify which bindings you want connected to the deployed resource on your Cloudflare account via the experimental_remote flag in your binding definition:
You can then run next dev to start a local development session (or start a preview with opennextjs-cloudflare preview), and all requests to env.MY_BUCKET will be proxied to the remote testing-bucket — rather than the default local binding simulations.
Remote bindings & ISR
Remote bindings are also used during the build process, which comes with significant benefits for pages using Incremental Static Regeneration (ISR) ↗. During the build step for an ISR page, your server executes the page's code just as it would for normal user requests. If a page needs data to display (like fetching user info from KV), those requests are actually made. The server then uses this fetched data to render the final HTML.
Data fetching is a critical part of this process, as the finished HTML is only as good as the data it was built with. If the build process can't fetch real data, you end up with a pre-rendered page that's empty or incomplete.
With remote bindings support in OpenNext, your pre-rendered pages are built with real data from the start. The build process uses any configured remote bindings, and any data fetching occurs against the deployed resources on your Cloudflare account.
Workers can now talk to each other across separate dev commands using service bindings and tail consumers, whether started with vite dev or wrangler dev.
Simply start each Worker in its own terminal:
Terminal window
# Terminal 1
vitedev
# Terminal 2
wranglerdev
This is useful when different teams maintain different Workers, or when each Worker has its own build setup or tooling.
We're announcing the GA of User Groups for Cloudflare Dashboard and System for Cross Domain Identity Management (SCIM) User Groups, strengthening our RBAC capabilities with stable, production-ready primitives for managing access at scale.
What's New
User Groups [GA]: User Groups are a new Cloudflare IAM primitive that enable administrators to create collections of account members that are treated equally from an access control perspective. User Groups can be assigned permission policies, with individual members in the group inheriting all permissions granted to the User Group. User Groups can be created manually or via our APIs.
SCIM User Groups [GA]: Centralize & simplify your user and group management at scale by syncing memberships directly from your upstream identity provider (like Okta or Entra ID) to the Cloudflare Platform. This ensures Cloudflare stays in sync with your identity provider, letting you apply Permission Policies to those synced groups directly within the Cloudflare Dashboard.
Stability & Scale:
These features have undergone extensive testing during the Public Beta period and are now ready for production use across enterprises of all sizes.
In AutoRAG, you can now view your object's custom metadata in the response from /search and /ai-search, and optionally add a context field in the custom metadata of an object to provide additional guidance for AI-generated answers.
You can add custom metadata to an object when uploading it to your R2 bucket.
Object's custom metadata in search responses
When you run a search, AutoRAG now returns any custom metadata associated with the object. This metadata appears in the response inside attributes then file , and can be used for downstream processing.
For example, the attributes section of your search response may look like:
"context":"A checklist for internal launch readiness, including legal, engineering, and marketing steps."
}
}
}
Add a context field to guide LLM answers
When you include a custom metadata field named context, AutoRAG attaches that value to each chunk of the file. When you run an /ai-search query, this context is passed to the LLM and can be used as additional input when generating an answer.
We recommend using the context field to describe supplemental information you want the LLM to consider, such as a summary of the document or a source URL. If you have several different metadata attributes, you can join them together however you choose within the context string.
For example:
{
"context":"summary: 'Checklist for internal product launch readiness, including legal, engineering, and marketing steps.'; url: 'https://wiki.company.com/docs/launch-checklist'"
}
This gives you more control over how your content is interpreted, without requiring you to modify the original contents of the file.
In AutoRAG, you can now filter by an object's file name using the filename attribute, giving you more control over which files are searched for a given query.
This is useful when your application has already determined which files should be searched. For example, you might query a PostgreSQL database to get a list of files a user has access to based on their permissions, and then use that list to limit what AutoRAG retrieves.
This allows you to connect your application logic with AutoRAG's retrieval process, making it easy to control what gets searched without needing to reindex or modify your data.
This allows users to query DNS analytics across multiple zones in their account, by using the accounts filter.
Here is an example to retrieve the most recent DNS queries across all zones in your account that resulted in an NXDOMAIN response over a given time frame. Please replace a30f822fcd7c401984bf85d8f2a5111c with your actual account ID.
Gateway will now evaluate Network (Layer 4) policiesbeforeHTTP (Layer 7) policies. This change preserves your existing security posture and does not affect which traffic is filtered — but it may impact how notifications are displayed to end users.
This change will roll out progressively between July 14–18, 2025. If you use HTTP policies, we recommend reviewing your configuration ahead of rollout to ensure the user experience remains consistent.
Updated order of enforcement
Previous order:
DNS policies
HTTP policies
Network policies
New order:
DNS policies
Network policies
HTTP policies
Action required: Review your Gateway HTTP policies
This change may affect block notifications. For example:
You have an HTTP policy to block example.com and display a block page.
You also have a Network policy to block example.com silently (no client notification).
With the new order, the Network policy will trigger first — and the user will no longer see the HTTP block page.
To ensure users still receive a block notification, you can:
Add a client notification to your Network policy, or
Use only the HTTP policy for that domain.
Why we’re making this change
This update is based on user feedback and aims to:
Create a more intuitive model by evaluating network-level policies before application-level policies.
Minimize 526 connection errors by verifying the network path to an origin before attempting to establish a decrypted TLS connection.
Log Explorer is now GA, providing native observability and forensics for traffic flowing through Cloudflare.
Search and analyze your logs, natively in the Cloudflare dashboard. These logs are also stored in Cloudflare's network, eliminating many of the costs associated with other log providers.
With Log Explorer, you can now:
Monitor security and performance issues with custom dashboards – use natural language to define charts for measuring response time, error rates, top statistics and more.
Investigate and troubleshoot issues with Log Search – use data type-aware search filters or custom sql to investigate detailed logs.
Save time and collaborate with saved queries – save Log Search queries for repeated use or sharing with other users in your account.
Access Log Explorer at the account and zone level – easily find Log Explorer at the account and zone level for querying any dataset.
Earlier this year, we announced the launch of the new Terraform v5 Provider.
Unlike the earlier Terraform providers, v5 is automatically generated based on the OpenAPI Schemas for our REST APIs. Since
launch, we have seen an unexpectedly high number of issues ↗
reported by customers. These issues currently impact about 15% of resources. We have been working diligently to address
these issues across the company, and have released the v5.6.0 release which includes a number of bug fixes. Please keep an
eye on this changelog for more information about upcoming releases.
Changes
Broad fixes across resources with recurring diffs, including, but not limited to:
cloudflare_zero_trust_access_identity_provider
cloudflare_zone
cloudflare_page_rules runtime panic when setting cache_level to cache_ttl_by_status
Failure to serialize requests in cloudflare_zero_trust_tunnel_cloudflared_config
Undocumented field 'priority' on zone_lockdown resource
Missing importability for cloudflare_zero_trust_device_default_profile_local_domain_fallback and cloudflare_account_subscription
New resources:
cloudflare_schema_validation_operation_settings
cloudflare_schema_validation_schemas
cloudflare_schema_validation_settings
cloudflare_zero_trust_device_settings
Other bug fixes
For a more detailed look at all of the changes, see the
changelog ↗ in GitHub.
If you have an unaddressed issue with the provider, we encourage you to check the
open issues ↗ and open a new one if one does not already
exist for what you are experiencing.
Upgrading
If you are evaluating a move from v4 to v5, please make use of the
migration guide ↗. We have
provided automated migration scripts using Grit which simplify the transition, although these do not support implementations which
use Terraform modules, so customers making use of modules need to migrate manually. Please make use of terraform plan to test
your changes before applying, and let us know if you encounter any additional issues by reporting to our
GitHub repository ↗.
Enterprise customers can now select NSEC3 as method for proof of non-existence on their zones.
What's new:
NSEC3 support for live-signed zones – For both primary and secondary zones that are configured to be live-signed (also known as "on-the-fly signing"), NSEC3 can now be selected as proof of non-existence.
NSEC3 support for pre-signed zones – Secondary zones that are transferred to Cloudflare in a pre-signed setup now also support NSEC3 as proof of non-existence.
For more information and how to enable NSEC3, refer to the NSEC3 documentation.
Custom Errors can now fetch and store assets and error pages from your origin even if they are served with a 4xx or 5xx HTTP status code — previously, only 200 OK responses were allowed.
What’s new:
You can now upload error pages and error assets that return error status codes (for example, 403, 500, 502, 503, 504) when fetched.
These assets are stored and minified at the edge, so they can be reused across multiple Custom Error rules without triggering requests to the origin.
This is especially useful for retrieving error content or downtime banners from your backend when you can’t override the origin status code.
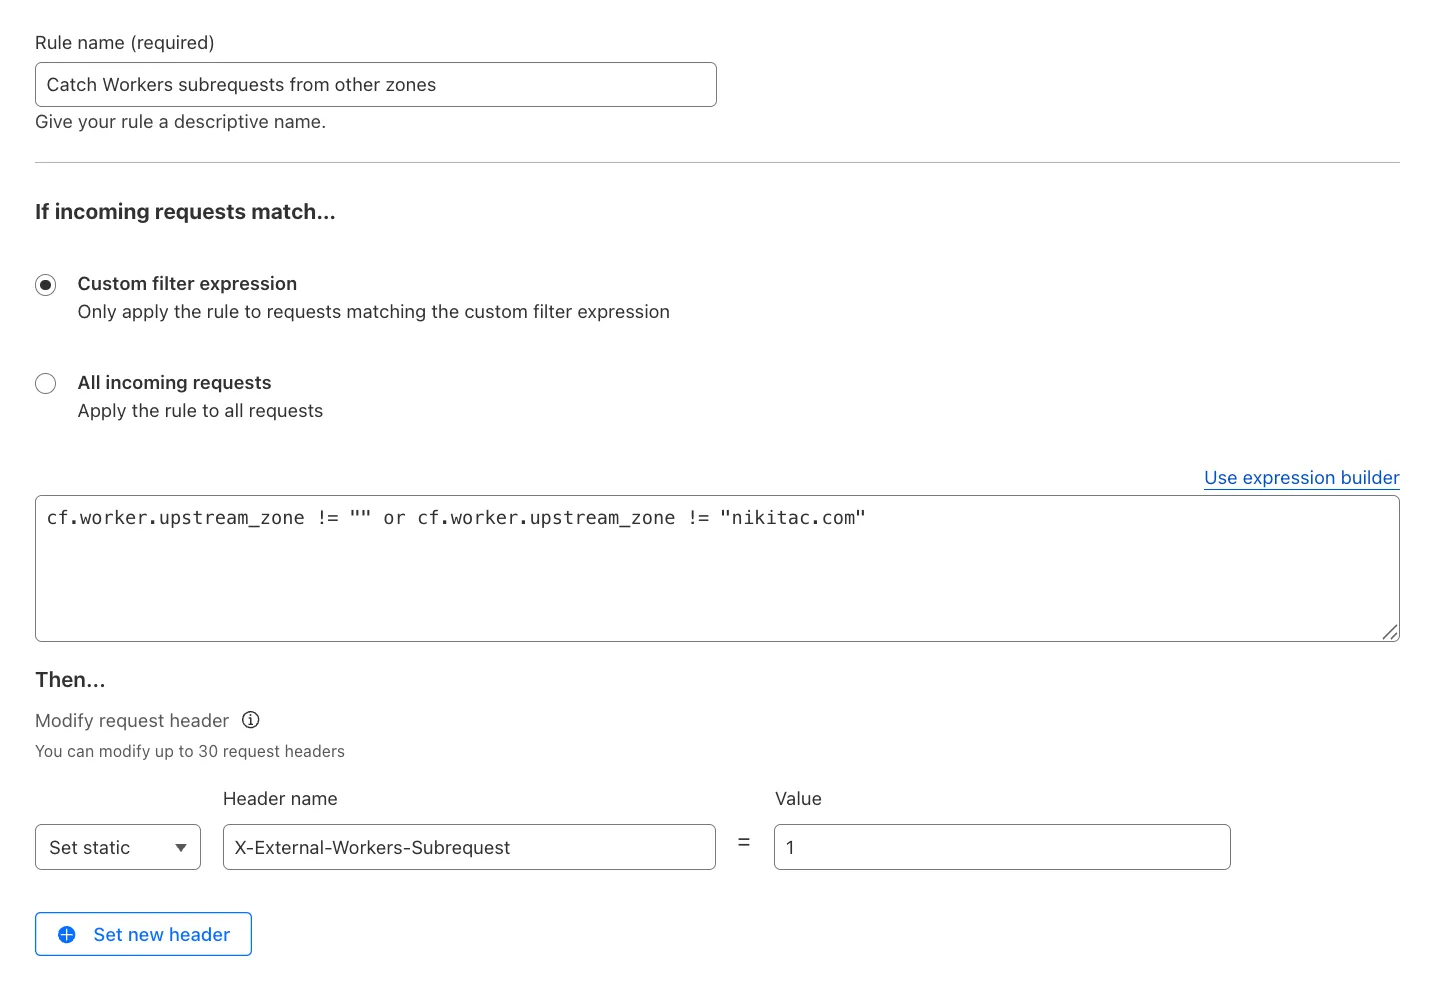
You can now use the cf.worker.upstream_zone field in Transform Rules to control rule execution based on whether a request originates from Workers, including subrequests issued by Workers in other zones.
What's new:
cf.worker.upstream_zone is now supported in Transform Rules expressions.
Redesigned the user interface, now centralized at the account level.
Introduced Private Load Balancers to the UI, enabling you to manage traffic for all of your external and internal applications in a single spot.
This update streamlines how you manage load balancers across multiple zones and extends robust traffic management to your private network infrastructure.
Key Enhancements:
Account-Level UI Consolidation:
Unified Management: Say goodbye to navigating individual zones for load balancing tasks. You can now view, configure, and monitor all your load balancers across every zone in your account from a single, intuitive interface at the account level.
Improved Efficiency: This centralized approach provides a more streamlined workflow, making it faster and easier to manage both your public-facing and internal traffic distribution.
Private Network Load Balancing:
Secure Internal Application Access: Create Private Load Balancers to distribute traffic to applications hosted within your private network, ensuring they are not exposed to the public Internet.
WARP & Magic WAN Integration: Effortlessly direct internal traffic from users connected via Cloudflare WARP or through your Magic WAN infrastructure to the appropriate internal endpoint pools.
Enhanced Security for Internal Resources: Combine reliable Load Balancing with Zero Trust access controls to ensure your internal services are both performant and only accessible by verified users.
Users can now use an OpenAI Compatible endpoint in AI Gateway to easily switch between providers, while keeping the exact same request and response formats. We're launching now with the chat completions endpoint, with the embeddings endpoint coming up next.
To get started, use the OpenAI compatible chat completions endpoint URL with your own account id and gateway id and switch between providers by changing the model and apiKey parameters.
OpenAI SDK Example
import OpenAI from "openai";
constclient=newOpenAI({
apiKey:"YOUR_PROVIDER_API_KEY",// Provider API key
messages: [{ role:"user", content:"What is Cloudflare?"}],
});
console.log(response.choices[0].message.content);
Additionally, the OpenAI Compatible endpoint can be combined with our Universal Endpoint to add fallbacks across multiple providers. That means AI Gateway will return every response in the same standardized format, no extra parsing logic required!
We're excited to announce the Public Beta launch of User Groups for Cloudflare Dashboard and System for Cross Domain Identity Management (SCIM) User Groups, expanding our RBAC capabilities to simplify user and group management at scale.
We've also visually overhauled the Permission Policies UI to make defining permissions more intuitive.
What's New
User Groups [BETA]: User Groups are a new Cloudflare IAM primitive that enable administrators to create collections of account members that are treated equally from an access control perspective. User Groups can be assigned permission policies, with individual members in the group inheriting all permissions granted to the User Group. User Groups can be created manually or via our APIs.
SCIM User Groups [BETA]: Centralize & simplify your user and group management at scale by syncing memberships directly from your upstream identity provider (like Okta or Entra ID) to the Cloudflare Platform. This ensures Cloudflare stays in sync with your identity provider, letting you apply Permission Policies to those synced groups directly within the Cloudflare Dashboard.
Revamped Permission Policies UI [BETA]: As Cloudflare's services have grown, so has the need for precise, role-based access control. We've given the Permission Policies builder a visual overhaul to make it much easier for administrators to find and define the exact permissions they want for specific principals.
You can now enable Polish with the webp format directly in Configuration Rules, allowing you to optimize image delivery for specific routes, user agents, or A/B tests — without applying changes zone-wide.
What’s new:
WebP is now a supported value in the Polish setting for Configuration Rules.
This gives you more precise control over how images are compressed and delivered, whether you're targeting modern browsers, running experiments, or tailoring performance by geography or device type.
We're excited to share that you can now use the Playwright MCP ↗ server with Browser Rendering.
Once you deploy the server, you can use any MCP client with it to interact with Browser Rendering. This allows you to run AI models that can automate browser tasks, such as taking screenshots, filling out forms, or scraping data.
All Cloudflare One Gateway users can now use Protocol detection logging and filtering, including those on Pay-as-you-go and Free plans.
With Protocol Detection, admins can identify and enforce policies on traffic proxied through Gateway based on the underlying network protocol (for example, HTTP, TLS, or SSH), enabling more granular traffic control and security visibility no matter your plan tier.
This feature is available to enable in your account network settings for all accounts. For more information on using Protocol Detection, refer to the Protocol detection documentation.
Cloudflare for SaaS ↗ allows you to extend the benefits of Cloudflare to your customers via their own custom or vanity domains. Now, the limit for custom hostnames ↗ on a Cloudflare for SaaS pay-as-you-go plan has been raised from 5,000 custom hostnames to 50,000 custom hostnames.
With custom origin server -- previously an enterprise-only feature -- you can route traffic from one or more custom hostnames somewhere other than your default proxy fallback. Custom origin server ↗ is now available to Cloudflare for SaaS customers on Free, Pro, and Business plans.
You can enable custom origin server on a per-custom hostname basis via the API ↗ or the UI:
We’ve launched two powerful new tools to make the GraphQL Analytics API more accessible:
GraphQL API Explorer
The new GraphQL API Explorer ↗ helps you build, test, and run queries directly in your browser. Features include:
In-browser schema documentation to browse available datasets and fields
Interactive query editor with autocomplete and inline documentation
A "Run in GraphQL API Explorer" button to execute example queries from our docs
Seamless OAuth authentication — no manual setup required
GraphQL Model Context Protocol (MCP) Server
MCP Servers let you use natural language tools like Claude to generate structured queries against your data. See our blog post ↗ for details on how they work and which servers are available. The new GraphQL MCP server ↗ helps you discover and generate useful queries for the GraphQL Analytics API. With this server, you can:
Explore what data is available to query
Generate and refine queries using natural language, with one-click links to run them in the API Explorer
Build dashboards and visualizations from structured query outputs
Example prompts include:
“Show me HTTP traffic for the last 7 days for example.com”
“What GraphQL node returns firewall events?”
“Can you generate a link to the Cloudflare GraphQL API Explorer with a pre-populated query and variables?”
We’re continuing to expand these tools, and your feedback helps shape what’s next. Explore the documentation to learn more and get started.
Earlier this year, we announced the launch of the new Terraform v5 Provider. Unlike the earlier Terraform providers, v5 is automatically generated based on the OpenAPI Schemas for our REST APIs. Since launch, we have seen an unexpectedly high number of issues ↗ reported by customers. These issues currently impact about 15% of resources. We have been working diligently to address these issues across the company, and have released the v5.5.0 release which includes a number of bug fixes. Please keep an eye on this changelog for more information about upcoming releases.
Changes
Broad fixes across resources with recurring diffs, including, but not limited to:
cloudflare_zero_trust_gateway_policy
cloudflare_zero_trust_access_application
cloudflare_zero_trust_tunnel_cloudflared_route
cloudflare_zone_setting
cloudflare_ruleset
cloudflare_page_rule
Zone settings can be re-applied without client errors
Page rules conversion errors are fixed
Failure to apply changes to cloudflare_zero_trust_tunnel_cloudflared_route
Other bug fixes
For a more detailed look at all of the changes, see the changelog ↗ in GitHub.
If you have an unaddressed issue with the provider, we encourage you to check the open issues ↗ and open a new one if one does not already exist for what you are experiencing.
Upgrading
If you are evaluating a move from v4 to v5, please make use of the migration guide ↗. We have provided automated migration scripts using Grit which simplify the transition, although these do not support implementations which use Terraform modules, so customers making use of modules need to migrate manually. Please make use of terraform plan to test your changes before applying, and let us know if you encounter any additional issues by reporting to our GitHub repository ↗.
A new Access Analytics dashboard is now available to all Cloudflare One customers. Customers can apply and combine multiple filters to dive into specific slices of their Access metrics. These filters include:
You can now safely open email attachments to view and investigate them.
What this means is that messages now have a Attachments section. Here, you can view processed attachments and their classifications (for example, Malicious, Suspicious, Encrypted). Next to each attachment, a Browser Isolation icon allows your team to safely open the file in a clientless, isolated browser with no risk to the analyst or your environment.
To use this feature, you must:
Enable Clientless Web Isolation in your Zero Trust settings.
Some attachment types may not render in Browser Isolation. If there is a file type that you would like to be opened with Browser Isolation, reach out to your Cloudflare contact.
This feature is available across these Email Security packages:
Hyperdrive has been approved for FedRAMP Authorization and is now available in the FedRAMP Marketplace ↗.
FedRAMP is a U.S. government program that provides standardized assessment and authorization for cloud products and services. As a result of this product update,
Hyperdrive has been approved as an authorized service to be used by U.S. federal agencies at the Moderate Impact level.
We are adding source origin restrictions to
the Media Transformations beta. This allows customers to restrict what sources
can be used to fetch images and video for transformations. This feature is the
same as --- and uses the same settings as ---
Image Transformations sources.
When transformations is first enabled, the default setting only allows
transformations on images and media from the same website or domain being used to make
the transformation request. In other words, by default, requests to
example.com/cdn-cgi/media can only reference originals on example.com.
Adding access to other sources, or allowing any source,
is easy to do
in the Transformations tab under Stream. Click each domain enabled for
Transformations and set its sources list to match the needs of your content. The
user making this change will need permission to edit zone settings.
Remote Browser Isolation (RBI) now supports SAML HTTP-POST bindings, enabling seamless authentication for SSO-enabled applications that rely on POST-based SAML responses from Identity Providers (IdPs) within a Remote Browser Isolation session. This update resolves a previous limitation that caused 405 errors during login and improves compatibility with multi-factor authentication (MFA) flows.
With expanded support for major IdPs like Okta and Azure AD, this enhancement delivers a more consistent and user-friendly experience across authentication workflows. Learn how to set up Remote Browser Isolation.
You can now create DNS policies to manage outbound traffic for an expanded list of applications.
This update adds support for 273 new applications, giving you more control over your organization's outbound traffic.
With this update, you can:
Create DNS policies for a wider range of applications
Manage outbound traffic more effectively
Improve your organization's security and compliance posture
You can now configure custom word lists to enforce case sensitivity. This setting supports flexibility where needed and aims to reduce false positives where letter casing is critical.
You can now publish messages to Cloudflare Queues directly via HTTP from any service or programming language that supports sending HTTP requests. Previously, publishing to queues was only possible from within Cloudflare Workers. You can already consume from queues via Workers or HTTP pull consumers, and now publishing is just as flexible.
Publishing via HTTP requires a Cloudflare API token with Queues Edit permissions for authentication. Here's a simple example:
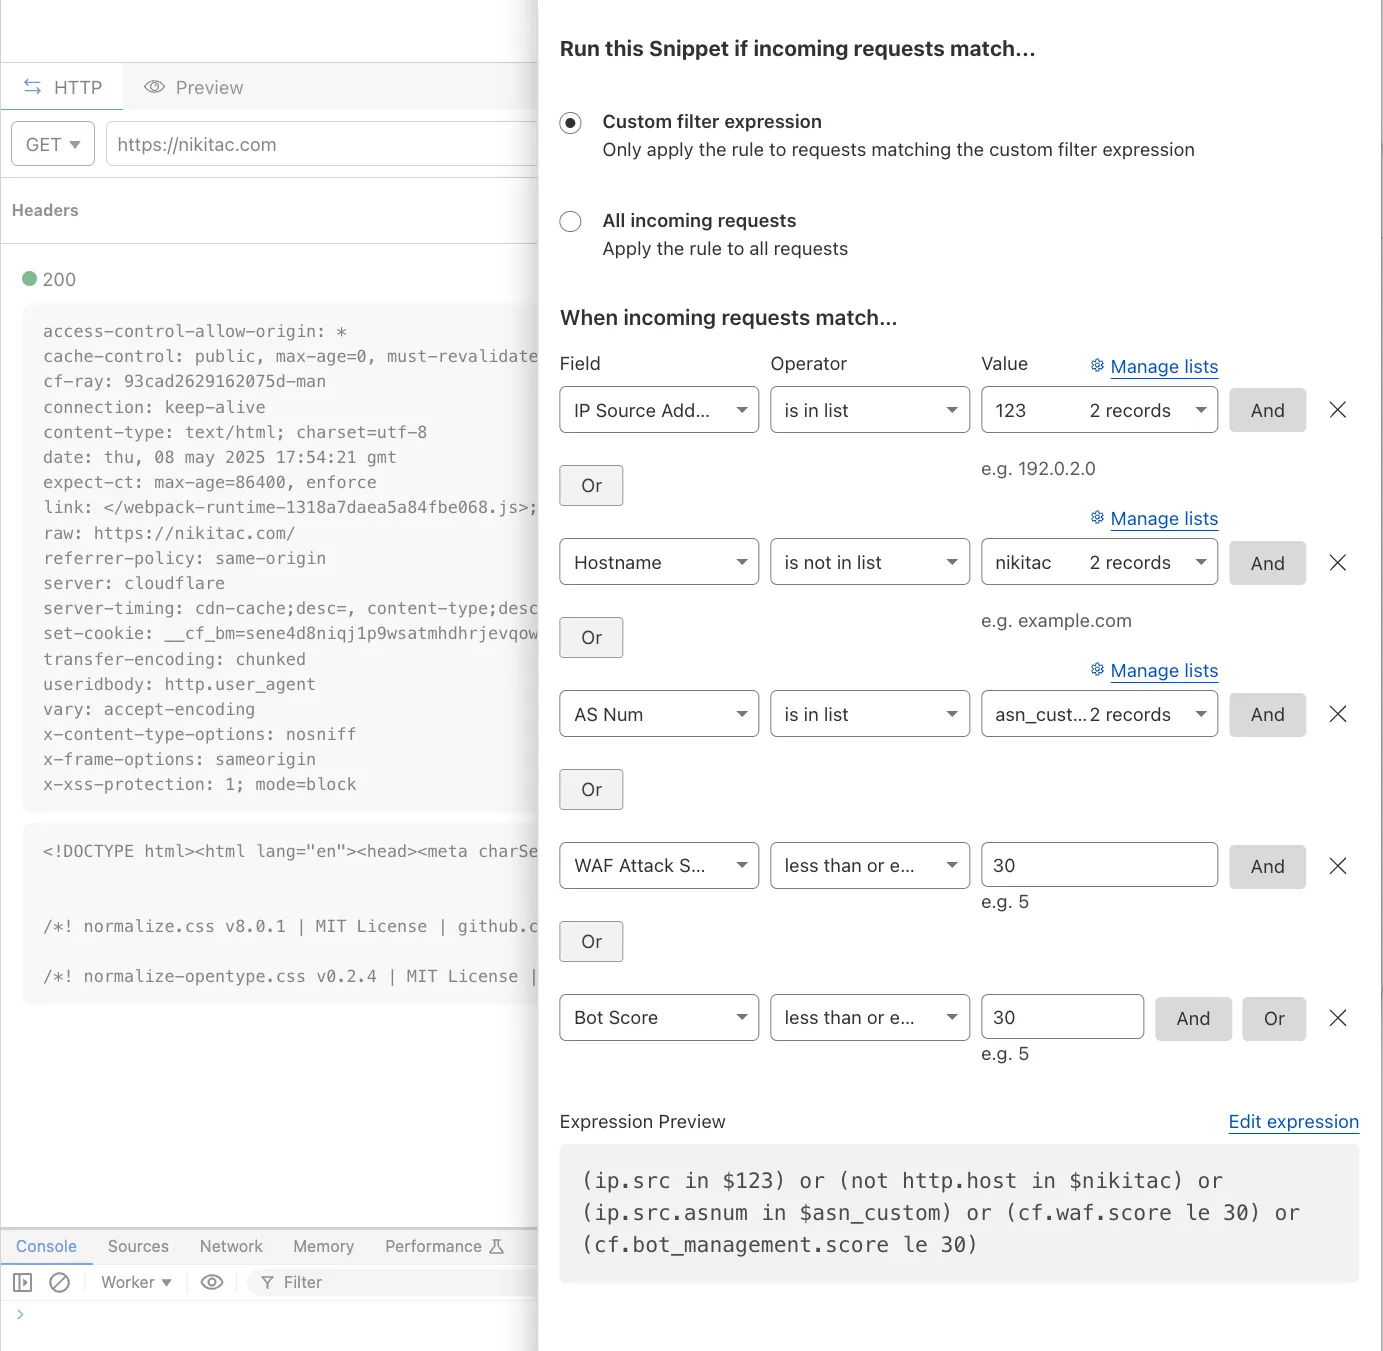
You can now use IP, Autonomous System (AS), and Hostname custom lists to route traffic to Snippets and Cloud Connector, giving you greater precision and control over how you match and process requests at the edge.
In Snippets, you can now also match on Bot Score and WAF Attack Score, unlocking smarter edge logic for everything from request filtering and mitigation to tarpitting and logging.
What’s new:
Custom lists matching – Snippets and Cloud Connector now support user-created IP, AS, and Hostname lists via dashboard or Lists API. Great for shared logic across zones.
Bot Score and WAF Attack Score – Use Cloudflare’s intelligent traffic signals to detect bots or attacks and take advanced, tailored actions with just a few lines of code.
These enhancements unlock new possibilities for building smarter traffic workflows with minimal code and maximum efficiency.
You can now safely open links in emails to view and investigate them.
From Investigation, go to View details, and look for the Links identified section. Next to each link, the Cloudflare dashboard will display an Open in Browser Isolation icon which allows your team to safely open the link in a clientless, isolated browser with no risk to the analyst or your environment. Refer to Open links to learn more about this feature.
To use this feature, you must:
Enable Clientless Web Isolation in your Zero Trust settings.
Enterprise customers can now choose the geographic location from which a URL scan is performed — either via Security Center in the Cloudflare dashboard or via the URL Scanner API.
This feature gives security teams greater insight into how a website behaves across different regions, helping uncover targeted, location-specific threats.
What’s new:
Location Picker: Select a location for the scan via Security Center → Investigate in the dashboard or through the API.
Region-aware scanning: Understand how content changes by location — useful for detecting regionally tailored attacks.
Default behavior: If no location is set, scans default to the user’s current geographic region.
You can now send DLP forensic copies to third-party storage for any HTTP policy with an Allow or Block action, without needing to include a DLP profile. This change increases flexibility for data handling and forensic investigation use cases.
By default, Gateway will send all matched HTTP requests to your configured DLP Forensic Copy jobs.
Earlier this year, we announced the launch of the new Terraform v5 Provider. Unlike the earlier Terraform providers, v5 is automatically generated based on the OpenAPI Schemas for our REST APIs. Since launch, we have seen an unexpectedly high number of issues ↗ reported by customers. These issues currently impact about 15% of resources. We have been working diligently to address these issues across the company, and have released the v5.4.0 release which includes a number of bug fixes. Please keep an eye on this changelog for more information about upcoming releases.
Changes
Removes the worker_platforms_script_secret resource from the provider (see migration guide ↗ for alternatives—applicable to both Workers and Workers for Platforms)
Removes duplicated fields in cloudflare_cloud_connector_rules resource
If you are evaluating a move from v4 to v5, please make use of the migration guide ↗. We have provided automated migration scripts using Grit which simplify the transition, although these do not support implementations which use Terraform modules, so customers making use of modules need to migrate manually. Please make use of terraform plan to test your changes before applying, and let us know if you encounter any additional issues either by reporting to our GitHub repository ↗, or by opening a support ticket ↗.
Cloudflare Load Balancing now supports UDP (Layer 4) and ICMP (Layer 3) health monitors for private endpoints. This makes it simple to track the health and availability of internal services that don’t respond to HTTP, TCP, or other protocol probes.
What you can do:
Set up ICMP ping monitors to check if your private endpoints are reachable.
Use UDP monitors for lightweight health checks on non-TCP workloads, such as DNS, VoIP, or custom UDP-based services.
Gain better visibility and uptime guarantees for services running behind Private Network Load Balancing, without requiring public IP addresses.
This enhancement is ideal for internal applications that rely on low-level protocols, especially when used in conjunction with Cloudflare Tunnel, WARP, and Magic WAN to create a secure and observable private network.
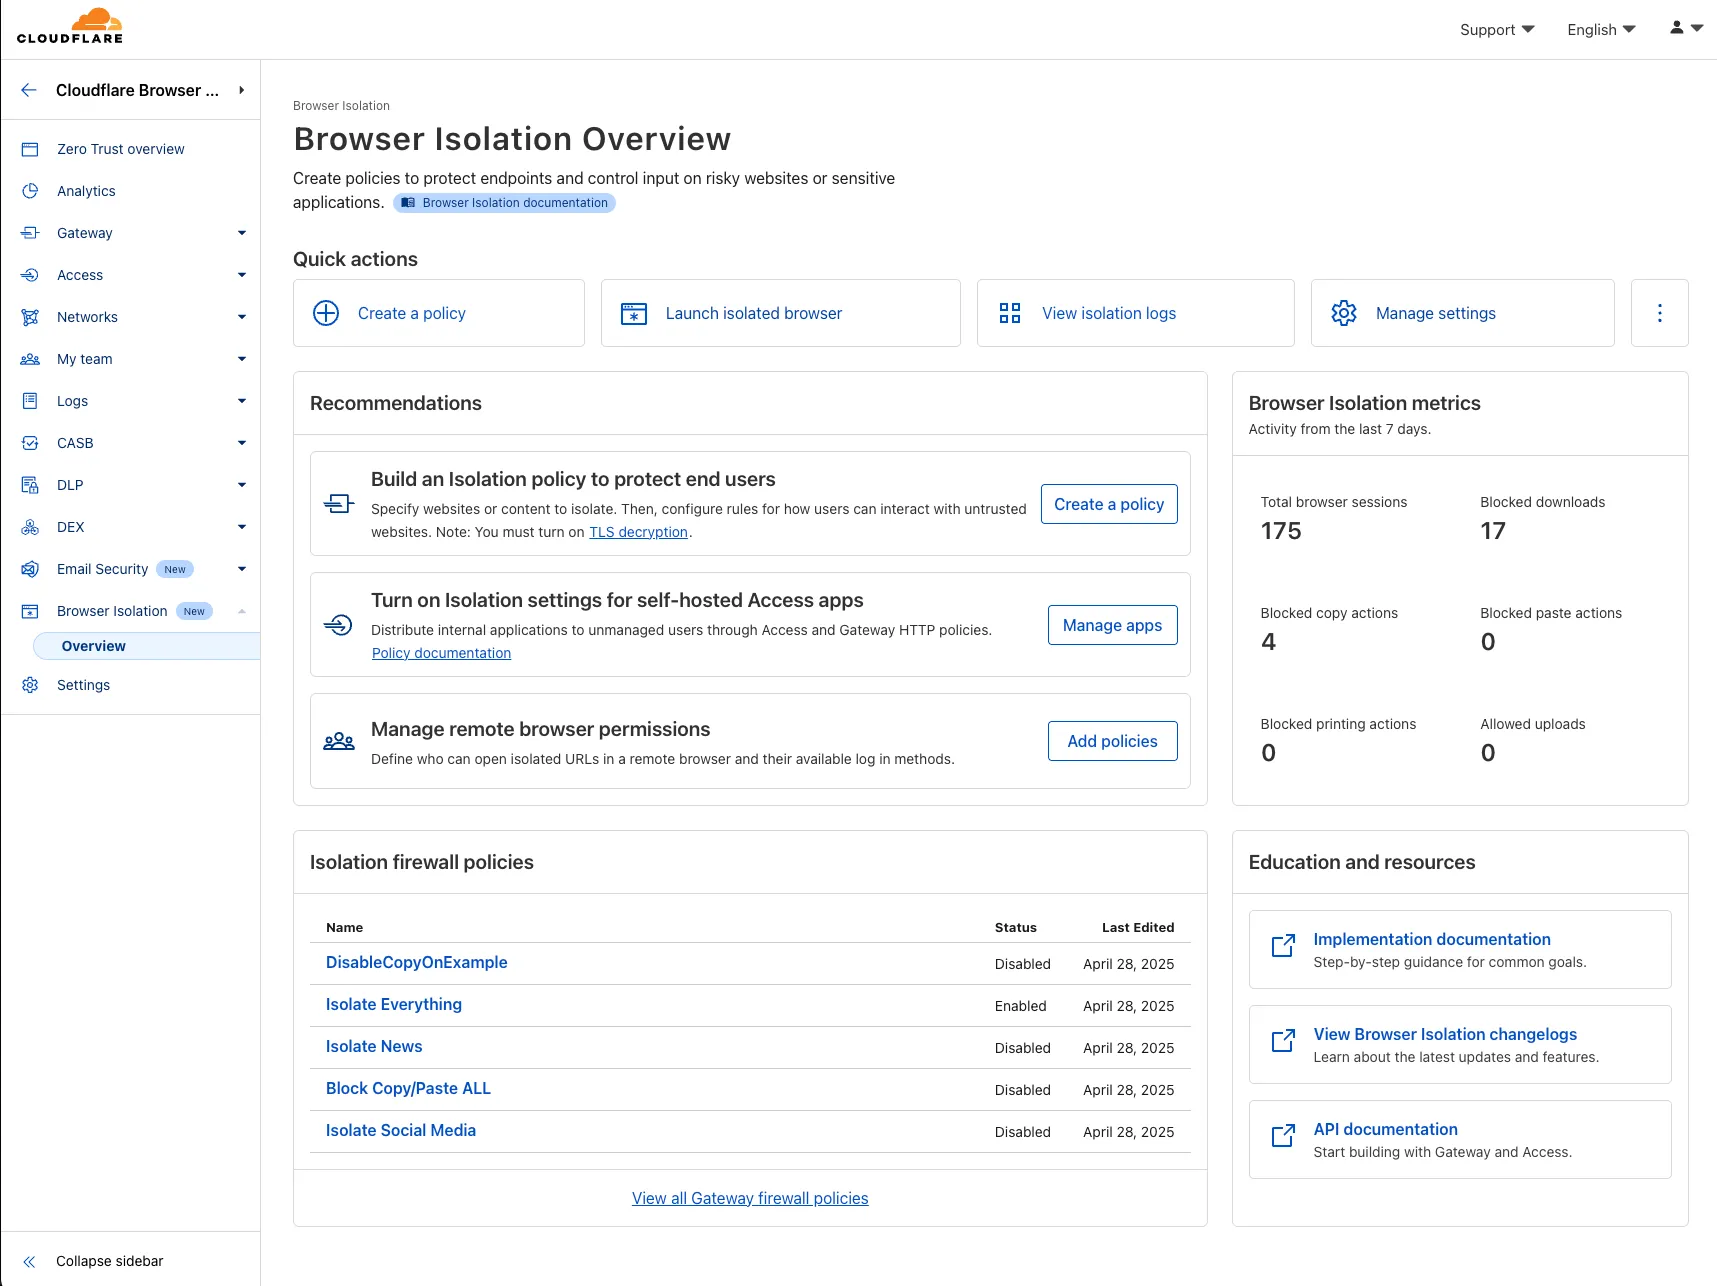
A new Browser Isolation Overview page is now available in the Cloudflare Zero Trust dashboard. This centralized view simplifies the management of Remote Browser Isolation (RBI) deployments, providing:
Streamlined Onboarding: Easily set up and manage isolation policies from one location.
Centralized Monitoring: Track aggregate usage and blocked actions.
This update consolidates previously disparate settings, accelerating deployment, improving visibility into isolation activity, and making it easier to ensure your protections are working effectively.
To access the new overview, log in to your Cloudflare Zero Trust dashboard ↗ and find Browser Isolation in the side navigation bar.
We're excited to announce several improvements to the Cloudflare R2 dashboard experience that make managing your object storage easier and more intuitive:
All-new settings page
We've redesigned the bucket settings page, giving you a centralized location to manage all your bucket configurations in one place.
Improved navigation and sharing
Deeplink support for prefix directories: Navigate through your bucket hierarchy without losing your state. Your browser's back button now works as expected, and you can share direct links to specific prefix directories with teammates.
Objects as clickable links: Objects are now proper links that you can copy or CMD + Click to open in a new tab.
Clearer public access controls
Renamed "r2.dev domain" to "Public Development URL" for better clarity when exposing bucket contents for non-production workloads.
Public Access status now clearly displays "Enabled" when your bucket is exposed to the internet (via Public Development URL or Custom Domains).
We've also made numerous other usability improvements across the board to make your R2 experience smoother and more productive.
Zero Trust Dashboard will automatically accept your user-level preferences for system settings, so if your Dashboard appearance is set to 'system' or 'dark', the Zero Trust dashboard will enter dark mode whenever the rest of your Cloudflare account does.
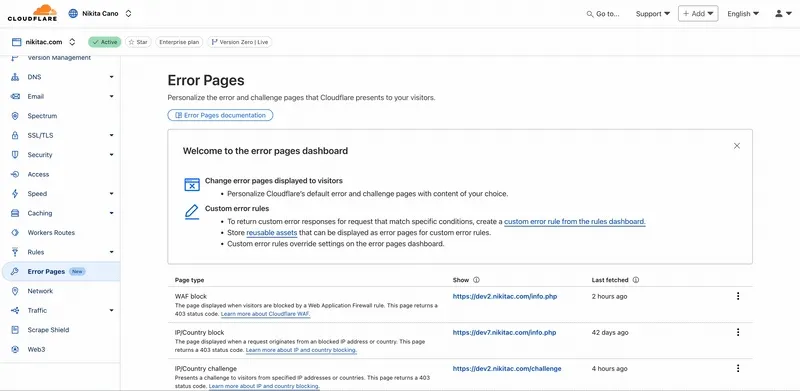
Custom Errors are now generally available for all paid plans — bringing a unified and powerful experience for customizing error responses at both the zone and account levels.
You can now manage Custom Error Rules, Custom Error Assets, and redesigned Error Pages directly from the Cloudflare dashboard. These features let you deliver tailored messaging when errors occur, helping you maintain brand consistency and improve user experience — whether it’s a 404 from your origin or a security challenge from Cloudflare.
What's new:
Custom Errors are now GA – Available on all paid plans and ready for production traffic.
UI for Custom Error Rules and Assets – Manage your zone-level rules from the Rules > Overview and your zone-level assets from the Rules > Settings tabs.
Define inline content or upload assets – Create custom responses directly in the rule builder, upload new or reuse previously stored assets.
Refreshed UI and new name for Error Pages – Formerly known as “Custom Pages,” Error Pages now offer a cleaner, more intuitive experience for both zone and account-level configurations.
Powered by Ruleset Engine – Custom Error Rules support conditional logic and override Error Pages for 500 and 1000 class errors, as well as errors originating from your origin or other Cloudflare products. You can also configure Response Header Transform Rules to add, change, or remove HTTP headers from responses returned by Custom Error Rules.
You can now filter AutoRAG search results by folder and timestamp using metadata filtering to narrow down the scope of your query.
This makes it easy to build multitenant experiences where each user can only access their own data. By organizing your content into per-tenant folders and applying a folder filter at query time, you ensure that each tenant retrieves only their own documents.
You can use metadata filtering by creating a new AutoRAG or reindexing existing data. To reindex all content in an existing AutoRAG, update any chunking setting and select Sync index. Metadata filtering is available for all data indexed on or after April 21, 2025.
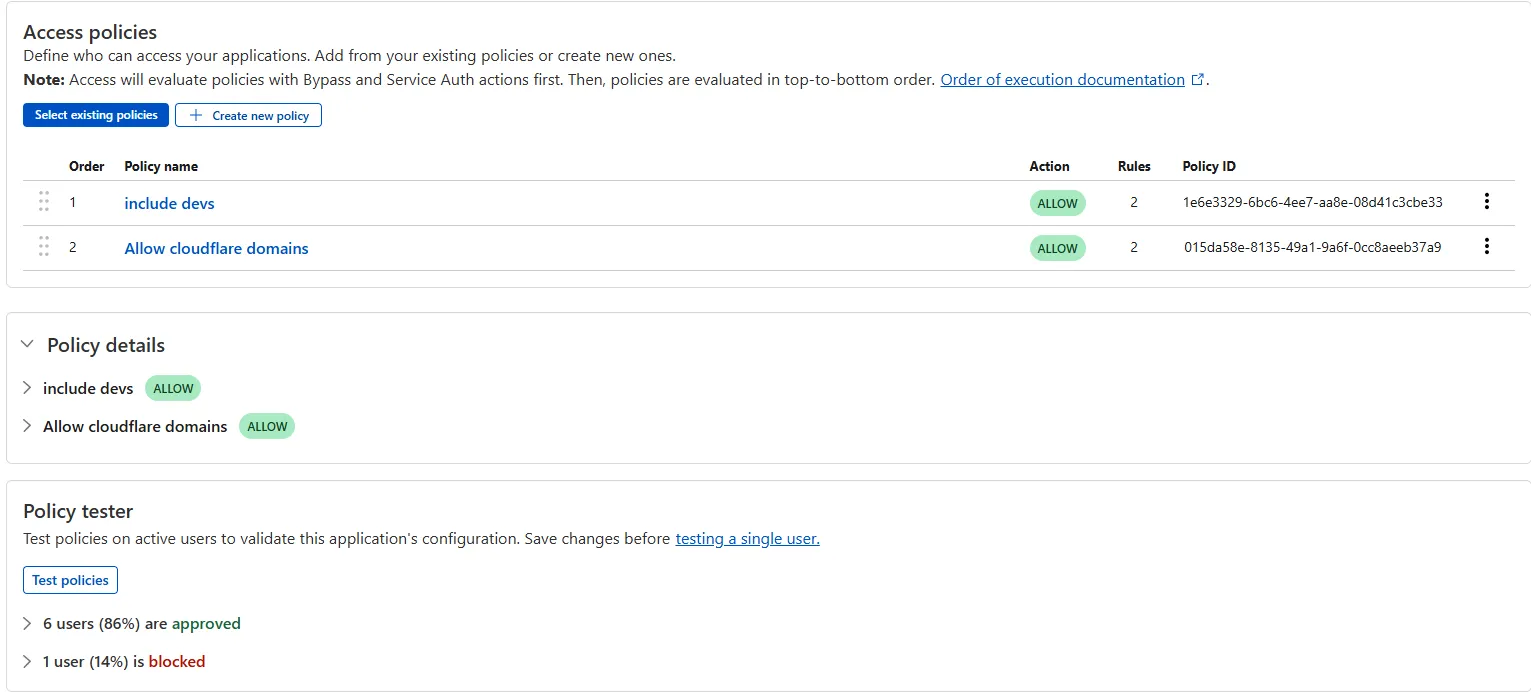
The Access bulk policy tester is now available in the Cloudflare Zero Trust dashboard. The bulk policy tester allows you to simulate Access policies against your entire user base before and after deploying any changes. The policy tester will simulate the configured policy against each user's last seen identity and device posture (if applicable).
Custom Fields now support logging both raw and transformed values for request and response headers in the HTTP requests dataset.
These fields are configured per zone and apply to all Logpush jobs in that zone that include request headers, response headers. Each header can be logged in only one format—either raw or transformed—not both.
By default:
Request headers are logged as raw values
Response headers are logged as transformed values
These defaults can be overidden to suit your logging needs.
For more information refer to Custom fields documentation
Queues pull consumers can now pull and acknowledge up to 5,000 messages / second per queue. Previously, pull consumers were rate limited to 1,200 requests / 5 minutes, aggregated across all queues.
Pull consumers allow you to consume messages over HTTP from any environment—including outside of Cloudflare Workers. They’re also useful when you need fine-grained control over how quickly messages are consumed.
To setup a new queue with a pull based consumer using Wrangler, run:
Create a queue with a pull based consumer
npxwranglerqueuescreatemy-queue
npxwranglerqueuesconsumerhttpaddmy-queue
You can also configure a pull consumer using the REST API or the Queues dashboard.
Once configured, you can pull messages from the queue using any HTTP client. You'll need a Cloudflare API Token with queues_read and queues_write permissions. For example:
To learn more about how to acknowledge messages, pull batches at once, and setup multiple consumers, refer to the pull consumer documentation.
As always, Queues doesn't charge for data egress. Pull operations continue to be billed at the existing rate, of $0.40 / million operations. The increased limits are available now, on all new and existing queues. If you're new to Queues, get started with the Cloudflare Queues guide.
You can now retrieve up to 100 keys in a single bulk read request made to Workers KV using the binding.
This makes it easier to request multiple KV pairs within a single Worker invocation. Retrieving many key-value pairs using the bulk read operation is more performant than making individual requests since bulk read operations are not affected by Workers simultaneous connection limits.
// Read single key
constkey="key-a";
constvalue=awaitenv.NAMESPACE.get(key);
// Read multiple keys
constkeys= ["key-a","key-b","key-c",...] // up to 100 keys
Cloudflare Stream has completed an infrastructure upgrade for our Live WebRTC beta support which brings increased scalability and improved playback performance to all customers. WebRTC allows broadcasting directly from a browser (or supported WHIP client) with ultra-low latency to tens of thousands of concurrent viewers across the globe.
Additionally, as part of this upgrade, the WebRTC beta now supports Signed URLs to protect playback, just like our standard live stream options (HLS/DASH).
Happy Developer Week 2025! Workers AI is excited to announce a couple of new features and improvements available today. Check out our blog ↗ for all the announcement details.
Faster inference + New models
We’re rolling out some in-place improvements to our models that can help speed up inference by 2-4x! Users of the models below will enjoy an automatic speed boost starting today:
@cf/meta/llama-3.3-70b-instruct-fp8-fast gets a speed boost of 2-4x, leveraging techniques like speculative decoding, prefix caching, and an updated inference backend.
With the bge models, we’re also announcing a new parameter called pooling which can take cls or mean as options. We highly recommend using pooling: cls which will help generate more accurate embeddings. However, embeddings generated with cls pooling are not backwards compatible with mean pooling. For this to not be a breaking change, the default remains as mean pooling. Please specify pooling: cls to enjoy more accurate embeddings going forward.
We’re also excited to launch a few new models in our catalog to help round out your experience with Workers AI. We’ll be deprecating some older models in the future, so stay tuned for a deprecation announcement. Today’s new models include:
@cf/mistralai/mistral-small-3.1-24b-instruct: a 24B parameter model achieving state-of-the-art capabilities comparable to larger models, with support for vision and tool calling.
@cf/google/gemma-3-12b-it: well-suited for a variety of text generation and image understanding tasks, including question answering, summarization and reasoning, with a 128K context window, and multilingual support in over 140 languages.
@cf/qwen/qwq-32b: a medium-sized reasoning model, which is capable of achieving competitive performance against state-of-the-art reasoning models, e.g., DeepSeek-R1, o1-mini.
Introducing a new batch inference feature that allows you to send us an array of requests, which we will fulfill as fast as possible and send them back as an array. This is really helpful for large workloads such as summarization, embeddings, etc. where you don’t have a human-in-the-loop. Using the batch API will guarantee that your requests are fulfilled eventually, rather than erroring out if we don’t have enough capacity at a given time.
Check out the tutorial to get started! Models that support batch inference today include:
We’ve upgraded our LoRA experience to include 8 newer models, and can support ranks of up to 32 with a 300MB safetensors file limit (previously limited to rank of 8 and 100MB safetensors) Check out our LoRAs page to get started. Models that support LoRAs now include:
Today, we're launching R2 Data Catalog in open beta, a managed Apache Iceberg catalog built directly into your Cloudflare R2 bucket.
If you're not already familiar with it, Apache Iceberg ↗ is an open table format designed to handle large-scale analytics datasets stored in object storage, offering ACID transactions and schema evolution. R2 Data Catalog exposes a standard Iceberg REST catalog interface, so you can connect engines like Spark, Snowflake, and PyIceberg to start querying your tables using the tools you already know.
To enable a data catalog on your R2 bucket, find R2 Data Catalog in your buckets settings in the dashboard, or run:
Terminal window
npxwranglerr2bucketcatalogenablemy-bucket
And that's it. You'll get a catalog URI and warehouse you can plug into your favorite Iceberg engines.
Visit our getting started guide for step-by-step instructions on enabling R2 Data Catalog, creating tables, and running your first queries.
Cloudflare Zero Trust SCIM provisioning now has a full audit log of all create, update and delete event from any SCIM Enabled IdP. The SCIM logs support filtering by IdP, Event type, Result and many more fields. This will help with debugging user and group update issues and questions.
SCIM logs can be found on the Zero Trust Dashboard under Logs -> SCIM provisioning.
Hyperdrive now supports more SSL/TLS security options for your database connections:
Configure Hyperdrive to verify server certificates with verify-ca or verify-full SSL modes and protect against man-in-the-middle attacks
Configure Hyperdrive to provide client certificates to the database server to authenticate itself (mTLS) for stronger security beyond username and password
Use the new wrangler cert commands to create certificate authority (CA) certificate bundles or client certificate pairs:
Cloudflare Secrets Store is available today in Beta. You can now store, manage, and deploy account level secrets from a secure, centralized platform to your Workers.
To spin up your Cloudflare Secrets Store, simply click the new Secrets Store tab in the dashboard ↗ or use this Wrangler command:
Terminal window
wranglersecrets-storestorecreate<name>--remote
The following are supported in the Secrets Store beta:
Secrets Store UI & API: create your store & create, duplicate, update, scope, and delete a secret
Workers UI: bind a new or existing account level secret to a Worker and deploy in code
Wrangler: create your store & create, duplicate, update, scope, and delete a secret
Account Management UI & API: assign Secrets Store permissions roles & view audit logs for actions taken in Secrets Store core platform
Email Workers enables developers to programmatically take action on anything that hits their email inbox. If you're building with Email Workers, you can now test the behavior of an Email Worker script, receiving, replying and sending emails in your local environment using wrangler dev.
Below is an example that shows you how you can receive messages using the email() handler and parse them using postal-mime ↗:
Now when you run npx wrangler dev, wrangler will expose a local /cdn-cgi/handler/email endpoint that you can POST email messages to and trigger your Worker's email() handler:
--data-raw'Received: from smtp.example.com (127.0.0.1)
by cloudflare-email.com (unknown) id 4fwwffRXOpyR
for <recipient@example.com>; Tue, 27 Aug 2024 15:50:20 +0000
From: "John" <sender@example.com>
Reply-To: sender@example.com
To: recipient@example.com
Subject: Testing Email Workers Local Dev
Content-Type: text/html; charset="windows-1252"
X-Mailer: Curl
Date: Tue, 27 Aug 2024 08:49:44 -0700
Message-ID: <6114391943504294873000@ZSH-GHOSTTY>
Hi there'
This is what you get in the console:
{
"headers":[
{
"key":"received",
"value":"from smtp.example.com (127.0.0.1) by cloudflare-email.com (unknown) id 4fwwffRXOpyR for <recipient@example.com>; Tue, 27 Aug 2024 15:50:20 +0000"
Local development is a critical part of the development flow, and also works for sending, replying and forwarding emails. See our documentation for more information.
Hyperdrive is now available on the Free plan of Cloudflare Workers, enabling you to build Workers that connect to PostgreSQL or MySQL databases without compromise.
Low-latency access to SQL databases is critical to building full-stack Workers applications. We want you to be able to build on fast, global apps on Workers,
regardless of the tools you use. So we made Hyperdrive available for all, to make it easier to build Workers that connect to PostgreSQL and MySQL.
If you want to learn more about how Hyperdrive works, read the deep dive ↗ on how Hyperdrive can make your database queries up to 4x faster.
Visit the docs to get started with Hyperdrive for PostgreSQL or MySQL.
Hyperdrive now supports connecting to MySQL and MySQL-compatible databases, including Amazon RDS and Aurora MySQL, Google Cloud SQL for MySQL, Azure Database for MySQL, PlanetScale and MariaDB.
Hyperdrive makes your regional, MySQL databases fast when connecting from Cloudflare Workers. It eliminates unnecessary network roundtrips during connection setup, pools database connections globally, and can cache query results to provide the fastest possible response times.
Best of all, you can connect using your existing drivers, ORMs, and query builders with Hyperdrive's secure credentials, no code changes required.
import {createConnection} from "mysql2/promise";
exportinterfaceEnv{
HYPERDRIVE:Hyperdrive;
}
exportdefault{
asyncfetch(request,env,ctx):Promise<Response>{
constconnection=awaitcreateConnection({
host:env.HYPERDRIVE.host,
user:env.HYPERDRIVE.user,
password:env.HYPERDRIVE.password,
database:env.HYPERDRIVE.database,
port:env.HYPERDRIVE.port,
disableEval: true,// Required for Workers compatibility
AutoRAG is now in open beta, making it easy for you to build fully-managed retrieval-augmented generation (RAG) pipelines without managing infrastructure. Just upload your docs to R2, and AutoRAG handles the rest: embeddings, indexing, retrieval, and response generation via API.
With AutoRAG, you can:
Customize your pipeline: Choose from Workers AI models, configure chunking strategies, edit system prompts, and more.
Instant setup: AutoRAG provisions everything you need from Vectorize, AI gateway, to pipeline logic for you, so you can go from zero to a working RAG pipeline in seconds.
Keep your index fresh: AutoRAG continuously syncs your index with your data source to ensure responses stay accurate and up to date.
Ask questions: Query your data and receive grounded responses via a Workers binding or API.
Whether you're building internal tools, AI-powered search, or a support assistant, AutoRAG gets you from idea to deployment in minutes.
Get started in the Cloudflare dashboard ↗ or check out the guide for instructions on how to build your RAG pipeline today.
We’re excited to announce Browser Rendering is now available on the Workers Free plan ↗, making it even easier to prototype and experiment with web search and headless browser use-cases when building applications on Workers.
The Browser Rendering REST API is now Generally Available, allowing you to control browser instances from outside of Workers applications. We've added three new endpoints to help automate more browser tasks:
Extract structured data – Use /json to retrieve structured data from a webpage.
Retrieve links – Use /links to pull all links from a webpage.
Convert to Markdown – Use /markdown to convert webpage content into Markdown format.
For example, to fetch the Markdown representation of a webpage:
We also recently landed support for Playwright in Browser Rendering for browser automation from Cloudflare Workers, in addition to Puppeteer, giving you more flexibility to test across different browser environments.
Visit the Browser Rendering docs to learn more about how to use headless browsers in your applications.
We're excited to share that you can now use Playwright's browser automation capabilities ↗ from Cloudflare Workers.
Playwright ↗ is an open-source package developed by Microsoft that can do browser automation tasks; it's commonly used to write software tests, debug applications, create screenshots, and crawl pages. Like Puppeteer, we forked ↗ Playwright and modified it to be compatible with Cloudflare Workers and Browser Rendering ↗.
Below is an example of how to use Playwright with Browser Rendering to test a TODO application using assertions:
Assertion example
import {launch, type BrowserWorker} from "@cloudflare/playwright";
import {expect} from "@cloudflare/playwright/test";
You can now access all Cloudflare cache purge methods — no matter which plan you’re on. Whether you need to update a single asset or instantly invalidate large portions of your site’s content, you now have the same powerful tools previously reserved for Enterprise customers.
Anyone on Cloudflare can now:
Purge Everything: Clears all cached content associated with a website.
Purge by Tag: Uses Cache-Tag response headers to invalidate grouped assets, offering flexibility for complex cache management scenarios.
Want to learn how each purge method works, when to use them, or what limits apply to your plan? Dive into our purge cache documentation and API reference ↗ for all the details.
With Email Security, you get two free CASB integrations.
Use one SaaS integration for Email Security to sync with your directory of users, take actions on delivered emails, automatically provide EMLs for reclassification requests for clean emails, discover CASB findings and more.
With the other integration, you can have a separate SaaS integration for CASB findings for another SaaS provider.
Queues now supports the ability to pause message delivery and/or purge (delete) messages on a queue. These operations can be useful when:
Your consumer has a bug or downtime, and you want to temporarily stop messages from being processed while you fix the bug
You have pushed invalid messages to a queue due to a code change during development, and you want to clean up the backlog
Your queue has a backlog that is stale and you want to clean it up to allow new messages to be consumed
To pause a queue using Wrangler, run the pause-delivery command. Paused queues continue to receive messages. And you can easily unpause a queue using the resume-delivery command.
Pause and resume a queue
$wranglerqueuespause-deliverymy-queue
Pausingmessagedeliveryforqueuemy-queue.
Pausedmessagedeliveryforqueuemy-queue.
$wranglerqueuesresume-deliverymy-queue
Resumingmessagedeliveryforqueuemy-queue.
Resumedmessagedeliveryforqueuemy-queue.
Purging a queue permanently deletes all messages in the queue. Unlike pausing, purging is an irreversible operation:
Cloudflare Registrar now supports .ai and .shop domains. These are two of our most highly-requested top-level domains (TLDs) and are great additions to the 300+ other TLDs we support ↗.
Starting today, customers can:
Register and renew these domains at cost without any markups or add-on fees
Enjoy best-in-class security and performance with native integrations with Cloudflare DNS, CDN, and SSL services like one-click DNSSEC
We can't wait to see what AI and e-commerce projects you deploy on Cloudflare. To get started, transfer your domains to Cloudflare or search for new ones to register ↗.
The latest version of audit logs streamlines audit logging by automatically capturing all user and system actions performed through the Cloudflare Dashboard or public APIs. This update leverages Cloudflare’s existing API Shield to generate audit logs based on OpenAPI schemas, ensuring a more consistent and automated logging process.
Availability: Audit logs (version 2) is now in Beta, with support limited to API access.
Use the following API endpoint to retrieve audit logs:
You can access detailed documentation for audit logs (version 2) Beta API release here ↗.
Key Improvements in the Beta Release:
Automated & standardized logging: Logs are now generated automatically using a standardized system, replacing manual, team-dependent logging. This ensures consistency across all Cloudflare services.
Expanded product coverage: Increased audit log coverage from 75% to 95%. Key API endpoints such as /accounts, /zones, and /organizations are now included.
Granular filtering: Logs now follow a uniform format, enabling precise filtering by actions, users, methods, and resources—allowing for faster and more efficient investigations.
Enhanced context and traceability: Each log entry now includes detailed context, such as the authentication method used, the interface (API or Dashboard) through which the action was performed, and mappings to Cloudflare Ray IDs for better traceability.
Comprehensive activity capture: Expanded logging to include GET requests and failed attempts, ensuring that all critical activities are recorded.
Known Limitations in Beta
Error handling for the API is not implemented.
There may be gaps or missing entries in the available audit logs.
UI is unavailable in this Beta release.
System-level logs and User-Activity logs are not included.
Support for these features is coming as part of the GA release later this year. For more details, including a sample audit log, check out our blog post: Introducing Automatic Audit Logs ↗
This new capability allows developers to establish persistent, low-latency connections between their applications and AI models, enabling natural, real-time conversational AI experiences, including speech-to-speech interactions.
Document conversion plays an important role when designing and developing AI applications and agents. Workers AI now provides the toMarkdown utility method that developers can use to for quick, easy, and convenient conversion and summary of documents in multiple formats to Markdown language.
You can call this new tool using a binding by calling env.AI.toMarkdown() or the using the REST API endpoint.
In this example, we fetch a PDF document and an image from R2 and feed them both to env.AI.toMarkdown(). The result is a list of converted documents. Workers AI models are used automatically to detect and summarize the image.
"data":"# somatosensory.pdf\n## Metadata\n- PDFFormatVersion=1.4\n- IsLinearized=false\n- IsAcroFormPresent=false\n- IsXFAPresent=false\n- IsCollectionPresent=false\n- IsSignaturesPresent=false\n- Producer=Prince 20150210 (www.princexml.com)\n- Title=Anatomy of the Somatosensory System\n\n## Contents\n### Page 1\nThis is a sample document to showcase..."
},
{
"name":"cat.jpeg",
"mimeType":"image/jpeg",
"format":"markdown",
"tokens":0,
"data":"The image is a close-up photograph of Grumpy Cat, a cat with a distinctive grumpy expression and piercing blue eyes. The cat has a brown face with a white stripe down its nose, and its ears are pointed upright. Its fur is light brown and darker around the face, with a pink nose and mouth. The cat's eyes are blue and slanted downward, giving it a perpetually grumpy appearance. The background is blurred, but it appears to be a dark brown color. Overall, the image is a humorous and iconic representation of the popular internet meme character, Grumpy Cat. The cat's facial expression and posture convey a sense of displeasure or annoyance, making it a relatable and entertaining image for many people."
}
]
See Markdown Conversion for more information on supported formats, REST API and pricing.
API Shield will scan for risks on your API inventory daily. Here are the new risks we're scanning for and automatically labelling:
cf-risk-sensitive: applied if the customer is subscribed to the sensitive data detection ruleset and the WAF detects sensitive data returned on an endpoint in the last seven days.
cf-risk-missing-auth: applied if the customer has configured a session ID and no successful requests to the endpoint contain the session ID.
cf-risk-mixed-auth: applied if the customer has configured a session ID and some successful requests to the endpoint contain the session ID while some lack the session ID.
cf-risk-missing-schema: added when a learned schema is available for an endpoint that has no active schema.
cf-risk-error-anomaly: added when an endpoint experiences a recent increase in response errors over the last 24 hours.
cf-risk-latency-anomaly: added when an endpoint experiences a recent increase in response latency over the last 24 hours.
cf-risk-size-anomaly: added when an endpoint experiences a spike in response body size over the last 24 hours.
In addition, API Shield has two new 'beta' scans for Broken Object Level Authorization (BOLA) attacks. If you're in the beta, you will see the following two labels when API Shield suspects an endpoint is suffering from a BOLA vulnerability:
cf-risk-bola-enumeration: added when an endpoint experiences successful responses with drastic differences in the number of unique elements requested by different user sessions.
cf-risk-bola-pollution: added when an endpoint experiences successful responses where parameters are found in multiple places in the request.
We are currently accepting more customers into our beta. Contact your account team if you are interested in BOLA attack detection for your API.
Refer to the blog post ↗ for more information about Cloudflare's expanded posture management capabilities.
Radar has expanded its security insights, providing visibility into aggregate trends in authentication requests,
including the detection of leaked credentials through leaked credentials detection scans.
We have now introduced the following endpoints:
summary: Retrieves summaries of HTTP authentication requests distribution across two different dimensions.
timeseries_group: Retrieves timeseries data for HTTP authentication requests distribution across two different dimensions.
The following dimensions are available, displaying the distribution of HTTP authentication requests based on:
compromised: Credential status (clean vs. compromised).
Workers AI is excited to add 4 new models to the catalog, including 2 brand new classes of models with a text-to-speech and reranker model. Introducing:
@cf/baai/bge-m3 - a multi-lingual embeddings model that supports over 100 languages. It can also simultaneously perform dense retrieval, multi-vector retrieval, and sparse retrieval, with the ability to process inputs of different granularities.
@cf/baai/bge-reranker-base - our first reranker model! Rerankers are a type of text classification model that takes a query and context, and outputs a similarity score between the two. When used in RAG systems, you can use a reranker after the initial vector search to find the most relevant documents to return to a user by reranking the outputs.
@cf/openai/whisper-large-v3-turbo - a faster, more accurate speech-to-text model. This model was added earlier but is graduating out of beta with pricing included today.
@cf/myshell-ai/melotts - our first text-to-speech model that allows users to generate an MP3 with voice audio from inputted text.
We’re removing some of the restrictions in Email Routing so that AI Agents and task automation can better handle email workflows, including how Workers can reply to incoming emails.
It's now possible to keep a threaded email conversation with an Email Worker script as long as:
The email can only be replied to once in the same EmailMessage event.
The recipient in the reply must match the incoming sender.
The outgoing sender domain must match the same domain that received the email.
Every time an email passes through Email Routing or another MTA, an entry is added to the References list. We stop accepting replies to emails with more than 100 References entries to prevent abuse or accidental loops.
Here's an example of a Worker responding to Emails using a Workers AI model:
Digital Experience Monitoring (DEX) provides visibility into device, network, and application performance across your Cloudflare SASE deployment. The latest release of the Cloudflare One agent (v2025.1.861) now includes device endpoint monitoring capabilities
to provide deeper visibility into end-user device performance which can be analyzed directly from the dashboard.
Device health metrics are now automatically collected, allowing administrators to:
View the last network a user was connected to
Monitor CPU and RAM utilization on devices
Identify resource-intensive processes running on endpoints
We’ve streamlined the Logpush setup process by integrating R2 bucket creation directly into the Logpush workflow!
Now, you no longer need to navigate multiple pages to manually create an R2 bucket or copy credentials. With this update, you can seamlessly configure a Logpush job to R2 in just one click, reducing friction and making setup faster and easier.
This enhancement makes it easier for customers to adopt Logpush and R2.
You can now use bucket locks to set retention policies on your R2 buckets (or specific prefixes within your buckets) for a specified period — or indefinitely. This can help ensure compliance by protecting important data from accidental or malicious deletion.
Locks give you a few ways to ensure your objects are retained (not deleted or overwritten). You can:
Lock objects for a specific duration, for example 90 days.
Lock objects until a certain date, for example January 1, 2030.
Lock objects indefinitely, until the lock is explicitly removed.
Buckets can have up to 1,000 bucket lock rules. Each rule specifies which objects it covers (via prefix) and how long those objects must remain retained.
Here are a couple of examples showing how you can configure bucket lock rules using Wrangler:
Ensure all objects in a bucket are retained for at least 180 days
Today, we are thrilled to announce Media Transformations, a new service that
brings the magic of Image Transformations to
short-form video files, wherever they are stored!
For customers with a huge volume of short video — generative AI output,
e-commerce product videos, social media clips, or short marketing content —
uploading those assets to Stream is not always practical. Sometimes, the
greatest friction to getting started was the thought of all that migrating.
Customers want a simpler solution that retains their current storage strategy to
deliver small, optimized MP4 files. Now you can do that with Media
Transformations.
To transform a video or image,
enable transformations for your
zone, then make a simple request with a specially formatted URL. The result is
an MP4 that can be used in an HTML video element without a player library.
If your zone already has Image Transformations enabled, then it is ready to
optimize videos with Media Transformations, too.
For example, we have a short video of the mobile in Austin's office. The
original is nearly 30 megabytes and wider than necessary for this layout.
Consider a simple width adjustment:
The result is less than 3 megabytes, properly sized, and delivered dynamically
so that customers do not have to manage the creation and storage of these
transformed assets.
With these enhanced logs, administrators can gain visibility into end user behavior in the remote browser and track blocked data extraction attempts, along with the websites that triggered them, in an isolated session.
{
"AccountID":"$ACCOUNT_ID",
"Decision":"block",
"DomainName":"www.example.com",
"Timestamp":"2025-02-27T23:15:06Z",
"Type":"copy",
"UserID":"$USER_ID"
}
User Actions available:
Copy & Paste
Downloads & Uploads
Printing
Learn more about how to get started with Logpush in our documentation.
Access for SaaS applications now include more configuration options to support a wider array of SaaS applications.
SAML and OIDC Field Additions
OIDC apps now include:
Group Filtering via RegEx
OIDC Claim mapping from an IdP
OIDC token lifetime control
Advanced OIDC auth flows including hybrid and implicit flows
SAML apps now include improved SAML attribute mapping from an IdP.
SAML transformations
SAML identities sent to Access applications can be fully customized using JSONata expressions. This allows admins to configure the precise identity SAML statement sent to a SaaS application.
You can now send detection logs to an endpoint of your choice with Cloudflare Logpush.
Filter logs matching specific criteria you have set and select from over 25 fields you want to send. When creating a new Logpush job, remember to select Email security alerts as the dataset.
We've released a new REST API for Browser Rendering in open beta, making interacting with browsers easier than ever. This new API provides endpoints for common browser actions, with more to be added in the future.
With the REST API you can:
Capture screenshots – Use /screenshot to take a screenshot of a webpage from provided URL or HTML.
Generate PDFs – Use /pdf to convert web pages into PDFs.
Extract HTML content – Use /content to retrieve the full HTML from a page.
Snapshot (HTML + Screenshot) – Use /snapshot to capture both the page's HTML and a screenshot in one request
Scrape Web Elements – Use /scrape to extract specific elements from a page.
Radar has expanded its DNS insights, providing visibility into aggregated traffic and usage trends observed by our 1.1.1.1 DNS resolver.
In addition to global, location, and ASN traffic trends, we are also providing perspectives on protocol usage, query/response characteristics, and DNSSEC usage.
Previously limited to the top locations and ASes endpoints, we have now introduced the following endpoints:
Workers AI now supports structured JSON outputs with JSON mode, which allows you to request a structured output response when interacting with AI models.
This makes it much easier to retrieve structured data from your AI models, and avoids the (error prone!) need to parse large unstructured text responses to extract your data.
JSON mode in Workers AI is compatible with the OpenAI SDK's structured outputs ↗response_format API, which can be used directly in a Worker:
Workflows now supports up to 4,500 concurrent (running) instances, up from the previous limit of 100. This limit will continue to increase during the Workflows open beta. This increase applies to all users on the Workers Paid plan, and takes effect immediately.
This allows more fine-grained control over transformation request flows and cache behavior. For example, you can resize, manipulate, and overlay images without requiring them to be accessible through a URL.
The Images binding can be configured in the Cloudflare dashboard for your Worker or in the wrangler.toml file in your project's directory:
Super Slurper can now migrate data from any S3-compatible object storage provider to Cloudflare R2. This includes transfers from services like MinIO, Wasabi, Backblaze B2, and DigitalOcean Spaces.
For more information on Super Slurper and how to migrate data from your existing S3-compatible storage buckets to R2, refer to our documentation.
We've updated the Workers AI text generation models to include context windows and limits definitions and changed our APIs to estimate and validate the number of tokens in the input prompt, not the number of characters.
This update allows developers to use larger context windows when interacting with Workers AI models, which can lead to better and more accurate results.
Our catalog page provides more information about each model's supported context window.
Previously, you could only configure Zaraz by going to each individual zone under your Cloudflare account. Now, if you’d like to get started with Zaraz or manage your existing configuration, you can navigate to the Tag Management ↗ section on the Cloudflare dashboard – this will make it easier to compare and configure the same settings across multiple zones.
These changes will not alter any existing configuration or entitlements for zones you already have Zaraz enabled on. If you’d like to edit existing configurations, you can go to the Tag Setup ↗ section of the dashboard, and select the zone you'd like to edit.
You can now customize a queue's message retention period, from a minimum of 60 seconds to a maximum of 14 days. Previously, it was fixed to the default of 4 days.
You can customize the retention period on the settings page for your queue, or using Wrangler:
You can now locally configure your Magic WAN Connector to work in a static IP configuration.
This local method does not require having access to a DHCP Internet connection. However, it does require being comfortable with using tools to access the serial port on Magic WAN Connector as well as using a serial terminal client to access the Connector's environment.
Cloudflare has supported both RSA and ECDSA certificates across our platform for a number of years. Both certificates offer the same security, but ECDSA is more performant due to a smaller key size. However, RSA is more widely adopted and ensures compatibility with legacy clients. Instead of choosing between them, you may want both – that way, ECDSA is used when clients support it, but RSA is available if not.
Now, you can upload both an RSA and ECDSA certificate on a custom hostname via the API.
curl -X POST https://api.cloudflare.com/client/v4/zones/$ZONE_ID/custom_hostnames \
-H 'Content-Type: application/json' \
-H "X-Auth-Email: $CLOUDFLARE_EMAIL" \
-H "X-Auth-Key: $CLOUDFLARE_API_KEY" \
-d '{
"hostname": "hostname",
"ssl": {
"custom_cert_bundle": [
{
"custom_certificate": "RSA Cert",
"custom_key": "RSA Key"
},
{
"custom_certificate": "ECDSA Cert",
"custom_key": "ECDSA Key"
}
],
"bundle_method": "force",
"wildcard": false,
"settings": {
"min_tls_version": "1.0"
}
}
}’
You can also:
Upload an RSA or ECDSA certificate to a custom hostname with an existing ECDSA or RSA certificate, respectively.
Replace the RSA or ECDSA certificate with a certificate of its same type.
Delete the RSA or ECDSA certificate (if the custom hostname has both an RSA and ECDSA uploaded).
This feature is available for Business and Enterprise customers who have purchased custom certificates.
AI Gateway adds additional ways to handle requests - Request Timeouts and Request Retries, making it easier to keep your applications responsive and reliable.
AI Gateway has added three new providers: Cartesia, Cerebras, and ElevenLabs, giving you more even more options for providers you can use through AI Gateway. Here's a brief overview of each:
Cartesia provides text-to-speech models that produce natural-sounding speech with low latency.
Cerebras delivers low-latency AI inference to Meta's Llama 3.1 8B and Llama 3.3 70B models.
ElevenLabs offers text-to-speech models with human-like voices in 32 languages.
To get started with AI Gateway, just update the base URL. Here's how you can send a request to Cerebras using cURL:
You can now implement our child safety tooling, the CSAM Scanning Tool, more easily. Instead of requiring external reporting credentials, you only need a verified email address for notifications to onboard. This change makes the tool more accessible to a wider range of customers.
Radar has expanded its AI insights with new API endpoints for Internet services rankings, robots.txt analysis, and AI inference data.
Internet services ranking
Radar now provides rankings for Internet services, including Generative AI platforms, based on anonymized 1.1.1.1 resolver data.
Previously limited to the annual Year in Review, these insights are now available daily via the API, through the following endpoints:
Radar now analyzes robots.txt files from the top 10,000 domains, identifying AI bot access rules.
AI-focused user agents from ai.robots.txt ↗ are categorized as:
Fully allowed/disallowed if directives apply to all paths (*).
Partially allowed/disallowed if restrictions apply to specific paths.
These insights are now available weekly via the API, through the following endpoints:
Radar now provides insights into public AI inference models from Workers AI, tracking usage trends across models and tasks.
These insights are now available via the API, through the following endpoints:
summary to view aggregated model and task popularity.
Cloudflare is removing five fields from the meta object of DNS records. These fields have been unused for more than a year and are no longer set on new records. This change may take up to four weeks to fully roll out.
The affected fields are:
the auto_added boolean
the managed_by_apps boolean and corresponding apps_install_id
the managed_by_argo_tunnel boolean and corresponding argo_tunnel_id
An example record returned from the API would now look like the following:
Workers for Platforms customers can now attach static assets (HTML, CSS, JavaScript, images) directly to User Workers, removing the need to host separate infrastructure to serve the assets.
This allows your platform to serve entire front-end applications from Cloudflare's global edge, utilizing caching for fast load times, while supporting dynamic logic within the same Worker. Cloudflare automatically scales its infrastructure to handle high traffic volumes, enabling you to focus on building features without managing servers.
What you can build
Static Sites: Host and serve HTML, CSS, JavaScript, and media files directly from Cloudflare's network, ensuring fast loading times worldwide. This is ideal for blogs, landing pages, and documentation sites because static assets can be efficiently cached and delivered closer to the user, reducing latency and enhancing the overall user experience.
Full-Stack Applications: Combine asset hosting with Cloudflare Workers to power dynamic, interactive applications. If you're an e-commerce platform, you can serve your customers' product pages and run inventory checks from within the same Worker.
Get Started:
Upload static assets using the Workers for Platforms API or Wrangler. For more information, visit our Workers for Platforms documentation. ↗
You can now have up to 1000 Workers KV namespaces per account.
Workers KV namespace limits were increased from 200 to 1000 for all accounts. Higher limits for Workers KV namespaces enable better organization of key-value data, such as by category, tenant, or environment.
Workflows (beta) now allows you to define up to 1024 steps. sleep steps do not count against this limit.
We've also added:
instanceId as property to the WorkflowEvent type, allowing you to retrieve the current instance ID from within a running Workflow instance
Improved queueing logic for Workflow instances beyond the current maximum concurrent instances, reducing the cases where instances are stuck in the queued state.
Support for pause and resume for Workflow instances in a queued state.
We're continuing to work on increases to the number of concurrent Workflow instances, steps, and support for a new waitForEvent API over the coming weeks.
Users making D1 requests via the Workers API can see up to a 60% end-to-end latency improvement due to the removal of redundant network round trips needed for each request to a D1 database.
p50, p90, and p95 request latency aggregated across entire D1 service. These latencies are a reference point and should not be viewed as your exact workload improvement.
This performance improvement benefits all D1 Worker API traffic, especially cross-region requests where network latency is an outsized latency factor. For example, a user in Europe talking to a database in North America. D1 location hints can be used to influence the geographic location of a database.
For more details on how D1 removed redundant round trips, see the D1 specific release note entry.
The latest cloudflared build 2024.12.2 ↗ introduces the ability to collect all the diagnostic logs needed to troubleshoot a cloudflared instance.
A diagnostic report collects data from a single instance of cloudflared running on the local machine and outputs it to a cloudflared-diag file.
The cloudflared-diag-YYYY-MM-DDThh-mm-ss.zip archive contains the files listed below. The data in a file either applies to the cloudflared instance being diagnosed (diagnosee) or the instance that triggered the diagnosis (diagnoser). For example, if your tunnel is running in a Docker container, the diagnosee is the Docker instance and the diagnoser is the host instance.
JSON traceroutes to Cloudflare's global network using IPv4 and IPv6
diagnoser
raw-network.txt
Raw traceroutes to Cloudflare's global network using IPv4 and IPv6
diagnoser
systeminformation.json
Operating system information and resource usage
diagnosee
task-result.json
Result of each diagnostic task
diagnoser
tunnelstate.json
Tunnel connections at the time of diagnosis
diagnosee
Footnotes
If the log file is blank, you may need to set --loglevel to debug when you start the tunnel. The --loglevel parameter is only required if you ran the tunnel from the CLI using a cloudflared tunnel run command. It is not necessary if the tunnel runs as a Linux/macOS service or runs in Docker/Kubernetes. ↩
Magic WAN and Magic Transit customers can use the Cloudflare dashboard to configure and manage BGP peering between their networks and their Magic routing table when using a Direct CNI on-ramp.
Using BGP peering with a CNI allows customers to:
Automate the process of adding or removing networks and subnets.
Take advantage of failure detection and session recovery features.
With this functionality, customers can:
Establish an eBGP session between their devices and the Magic WAN / Magic Transit service when connected via CNI.
Secure the session by MD5 authentication to prevent misconfigurations.
Exchange routes dynamically between their devices and their Magic routing table.
You can now generate customized terraform files for building cloud network on-ramps to Magic WAN.
Magic Cloud can scan and discover existing network resources and generate the required terraform files to automate cloud resource deployment using their existing infrastructure-as-code workflows for cloud automation.
You might want to do this to:
Review the proposed configuration for an on-ramp before deploying it with Cloudflare.
Deploy the on-ramp using your own infrastructure-as-code pipeline instead of deploying it with Cloudflare.
You can now use CASB to find security misconfigurations in your AWS cloud environment using Data Loss Prevention.
You can also connect your AWS compute account to extract and scan your S3 buckets for sensitive data while avoiding egress fees. CASB will scan any objects that exist in the bucket at the time of configuration.
To connect a compute account to your AWS integration:
You can now type in languages that use diacritics (like á or ç) and character-based scripts (such as Chinese, Japanese, and Korean) directly within the remote browser. The isolated browser now properly recognizes non-English keyboard input, eliminating the need to copy and paste content from a local browser or device.
You can now easily enable Real User Monitoring (RUM) monitoring for your hostnames, while safely dropping requests from visitors in the European Union to comply with GDPR and CCPA.
Our Web Analytics product has always been centered on giving you insights into your users' experience that you need to provide the best quality experience, without sacrificing user privacy in the process.
To help with that aim, you can now selectively enable RUM monitoring for your hostname and exclude EU visitor data in a single click. If you opt for this option, we will drop all metrics collected by our EU data centeres automatically.
You can learn more about what metrics are reported by Web Analytics and how it is collected in the Web Analytics documentation. You can enable Web Analytics on any hostname by going to the Web Analytics ↗ section of the dashboard, selecting "Manage Site" for the hostname you want to monitor, and choosing the appropriate enablement option.